Termimal 终端配置
默认的终端相对比较朴素,缺乏一些额外的信息,可以通过一些自定义的终端配置来实现终端的美化和自定义信息的展示。
美化方面见仁见智了,但是一些核心信息的展示对于平时的开发还是很有帮助的。
以下介绍我在 Debian 系统上的配置流程,配置的套件是:zsh + Starship
zsh
在 Debian 上安装 zsh :apt install zsh
oh my zsh 也需要安装下:https://github.com/ohmyzsh/ohmyzsh
下载相应的插件:
git clone https://github.com/zsh-users/zsh-autosuggestions.git $ZSH_CUSTOM/plugins/zsh-autosuggestions
git clone https://github.com/zsh-users/zsh-syntax-highlighting.git $ZSH_CUSTOM/plugins/zsh-syntax-highlighting
git clone https://github.com/zdharma-continuum/fast-syntax-highlighting.git $ZSH_CUSTOM/plugins/fast-syntax-highlighting
git clone --depth 1 -- https://github.com/marlonrichert/zsh-autocomplete.git $ZSH_CUSTOM/plugins/zsh-autocomplete
下载完成后在 .zshrc 的 plugin 中加入以下内容(注意:增加插件会导致shell启动的时候变慢,目前测试看 autocomplete插件很慢):
plugins=(git zsh-autosuggestions zsh-syntax-highlighting fast-syntax-highlighting zsh-autocomplete)
Nerd Font
Nerd Fonts 是一个开源的字体库,拥有很多的字体和icon图片,用于非常丰富的图icon,所以第一步需要先安装下 Nerd Fonts。
在 Linux 平台上,直接 git clone 相应的仓库
git clone --depth=1 https://github.com/ryanoasis/nerd-fonts.git
执行脚本 ./install.sh JetBrainsMono ,安装的字体可以根据自己的需求进行安装。
./install.sh -h 可以查看脚本提供了哪些命令。
如果什么参数都不跟的话,则会安装所有的字体。(全部安装也没必要,选择自己需要的字体进行安装就好了)
查看有哪些 icon 的话可以在 Nerd Fonts 官网中查看:https://www.nerdfonts.com/cheat-sheet
Starship
Starship
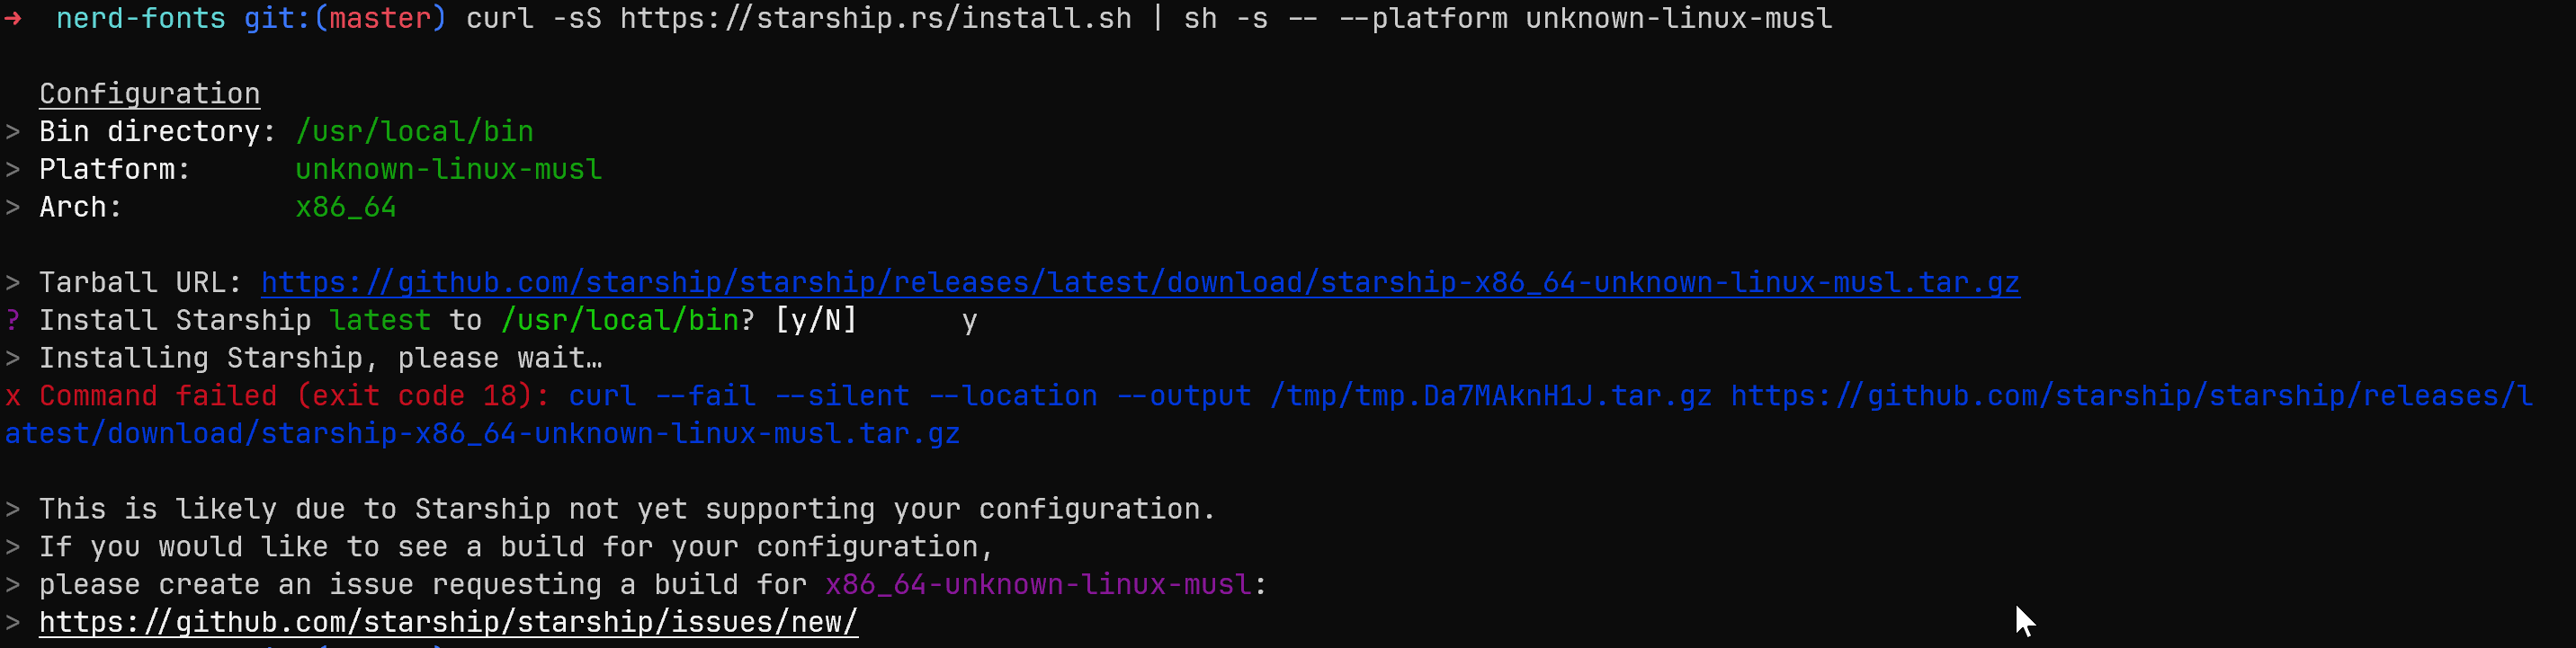
终端美化,在 Debian 上安装使用官方的命令脚本:curl -sS https://starship.rs/install.sh | sh 会报错,安装如果有问题可以选择其他方式进行安装,具体参考官方的
安装文档
。
这里我使用 rust 的包管理工具 cargo 来安装,安装前需要先安装 cmake,在 debian 执行 apt-get install cmake 进行安装
cargo install starship --locked
安装完成后,在 .zshrc 中增加如下配置开启 Starship
eval "$(starship init zsh)"
fzf
fzf 是一个模糊搜索工具,暂时还没发挥它的完全作用,得再研究一下:
git clone --depth 1 https://github.com/junegunn/fzf.git ~/.fzf
安装命令:~/.fzf/install
安装完成后需要在 .zshrc 中添加:
[ -f ~/.fzf.zsh ] && source ~/.fzf.zsh
查询输入历史命令的快捷键:CTRL+R
查找目录的快捷键是:ALT+C
查找文件的快捷键是:CRTL+T
参考链接
https://www.youtube.com/watch?v=AK2JE2YsKto https://gist.github.com/n1snt/454b879b8f0b7995740ae04c5fb5b7df
配置
Starship
# ~/.config/starship.toml
add_newline = true
command_timeout = 10000
format = """\
[╭╴╴](238)$os$username$hostname$kubernetes$directory$git_branch$git_status
[╰─](238)$character"""
# Drop ugly default prompt characters
[character]
success_symbol = ''
error_symbol = ''
[os]
format = '[$symbol](212) '
disabled = false
[os.symbols]
Windows = ' '
Arch = ''
Ubuntu = ''
Macos = ''
Debian = ''
# ---y
# Shows the username
[username]
style_user = 'white bold'
style_root = 'black bold'
format = '[$user]($style) '
disabled = false
show_always = true
# Shows the hostname
[hostname]
ssh_only = false
format = 'on [$hostname](bold yellow) '
disabled = false
# Shows current directory
[directory]
truncation_length = 0
#truncation_symbol = '…/'
truncate_to_repo=false
home_symbol = ' ~'
read_only_style = '197'
read_only = ' '
format = 'at [$path]($style)[$read_only]($read_only_style) '
# Shows current git branch
[git_branch]
symbol = ' '
#symbol = ' '
format = 'via [$symbol$branch]($style)'
# truncation_length = 4
truncation_symbol = '…/'
style = 'bold green'
# Shows current git status
[git_status]
format = '([ \( $all_status$ahead_behind\)]($style) )'
style = 'bold green'
conflicted = '[ confliced=${count}](red) '
up_to_date = '[ up-to-date](green) '
untracked = '[ untracked=${count}](red) '
ahead = ' ahead=${count}'
diverged = ' ahead=${ahead_count} behind=${behind_count}'
behind = ' behind=${count}'
stashed = '[ stashed=${count}](green) '
modified = '[ modified=${count}](yellow) '
staged = '[ staged=${count}](green) '
renamed = '[ renamed=${count}](yellow) '
deleted = '[ deleted=${count}](red) '
# Shows kubernetes context and namespace
[kubernetes]
format = 'via [ $context\($namespace\)](bold purple) '
disabled = false
[git_commit]
commit_hash_length = 4
tag_symbol = '🔖 '